The first step, of course, is to open Xcode. If you have installed the Developer Tools on OS X, it will be in /Developer/Applications. (You did install the dev tools right?)
The first thing you need to do, once Xcode has started, is create the project. This is done by choosing the "New Project..." menu item from the "File" menu. You should be presented with the window shown below.
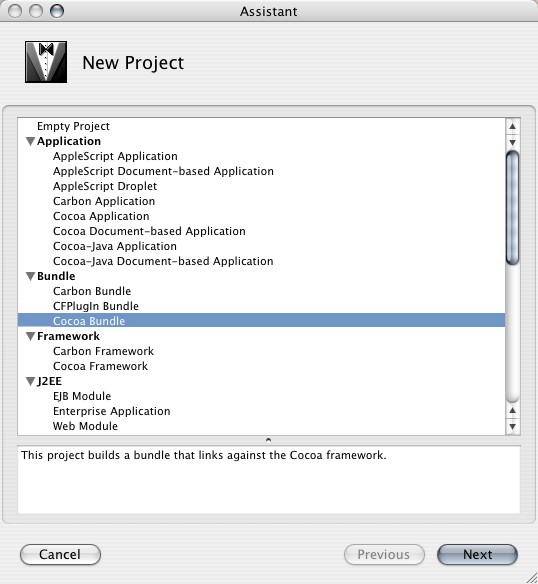
Select the "Cocoa Bundle" project under the "Bundle" grouping, as pictured above, and click on the "Next" button.
In the next window, shown below, enter the name of the project. We will call our project "iSimplePlug". Your window should look as follows.
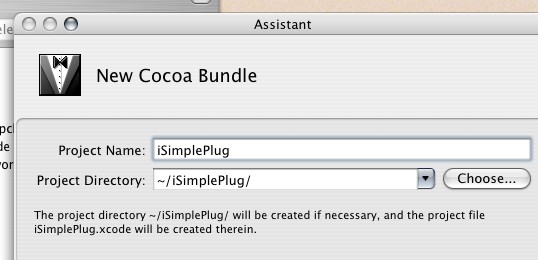
Take note of what directory the project is being placed in. In my picture, the project is being placed in the "iSImplePlug" directory in my home directory. You are welome to choose a different directory for the project to reside in, but you will need to remember where you put it.
Oh yeah, and press Finish when you are ready to continue.
We must edit some of the parameters for the project.
Once the project window loads click on the triangle next to the "Targets" group, to reveal the "iSimplePlug" target. Click on the target to select it, as shown below.
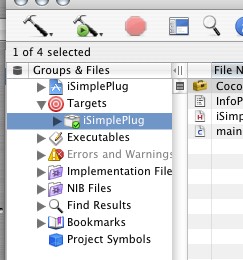
Now choose the "Get Info" menu item from the "Project" menu while the project is selected. (You could also press Cmd-I to get info.) It should present a window like the one below. If the "Build" tab isn't selected already, do so now.
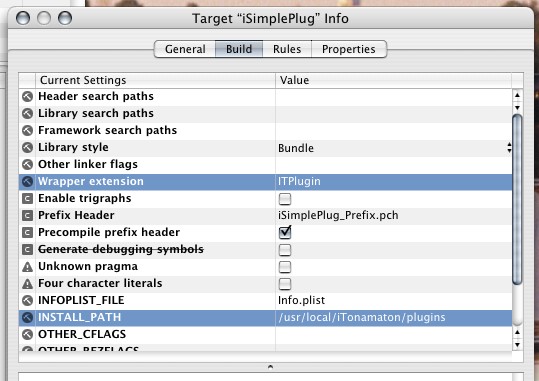
I have hilighted the entries we are going to change. First change the value of the "Wrapper extension" property to "ITPlugin". This will make the built plugin's file be "iSimplePlug.ITPlugin" instead of "iSimplePlug.bundle". Next change the "INSTALL_PATH" to "/usr/local/iTonamaton/plugins". I will admit now that this step isn't really necessary, but it good form, as this is the intended installation location for this plugin.
Lastely, select the "Properties" tab to reveal the content pictured below.
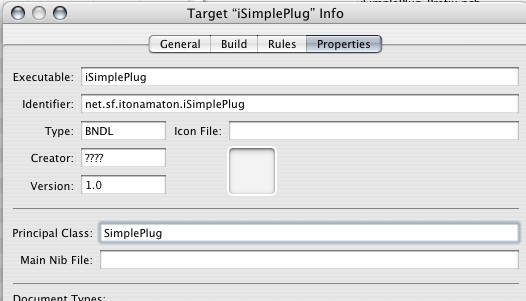
Here, we will change the Principal Class from nothing to "SimplePlug". This tells iTonamaton what the "SimplePlug" class is the main class for the plugin. (Note that this main class can really be called whatever you like, however it is good form for it to be named after the plugin it is in.)
Also, change the identifier from "com.apple.yourcocoabundle" to something else. This identifier is supposed to follow a reverse domain naming scheme. I chose "net.sf.itonamaton.iSimplePlug" since my plugin is available on the iTonamaton sourceforge site. You may want to choose something more appropriate to yourself. Regardless, you'll probably want to make the last segment be "iSimplePlug".
Go ahead and close the info window.
We now want to remove the "main.c" file, that was automatically created for us, from the project. This file is essentially empty, and is not needed by our plugin.
Open the "iSimplePlug" project group in the project window. Then open the "Other Sources" file group, and select "main.c". Your project window should look similar to the one below.
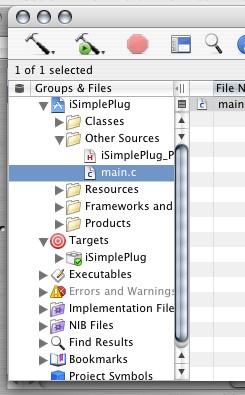
Remove the the "main.c" file from the project by pressing the "delete" key. (The one above the backslash on most standard Apple keyboards). You should be presented with a dialog like the one below.

Click on the "Delete Referencees & Files" button. The "main.c" should now be deleted from both the hard drive and the project.
We now need to remove some frameworks that our project does not use.
Start by opening the "Frameworks and Libraries" file group from the "iSimplePlug" group. Then open both of the subgroups ("Linked Frameworks" and "Other Frameworks"). Select both the "Cocoa.framework" framework and the "AppKit.framework" framework. (Use the command key to add the second framework to the selection.) Your window should look like the one pictured below:
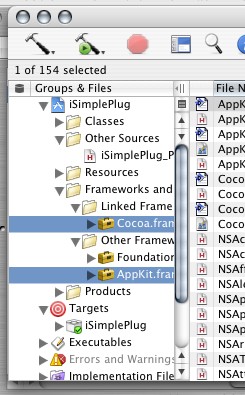
We do not need either of these frameworks. The Cocoa framework is merely a combination of both the AppKit and Foundation frameworks, and the AppKit framework is for GUI widgetry (which we don't use). Thus, press the "delete" key to remove them from the project. Be sure to only delete the references this time--as opposed to the references and the files. These are system files, so you want to keep them!
As a consequence of removing the Cocoa framework, we have to make sure that the Foundation framework will be linked against when we compile. To do this, select the "iSimplePlug" group, and make sure the target checkbox for "Foundation.framework" is checked in the file list. (The target checkbox is in the column with the bulls-eye icon.) The picture below shows what the window should look like if done properly. Note that the mouse cursor resides next to the checkbox that must be checked.

Lastely, we will want to remove the AppKit from the pre compiled header. Go back to the "Other Sources" file group, and double-click on "iSimplePlug_Prefix.pch". You will be presented with the source code for this file. Delete the line that says #import <AppKit/AppKit.h>. The result should look as follows:
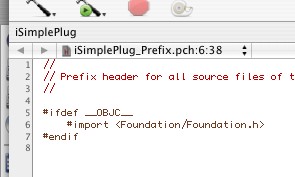
Save the file and close the editor window.
Next, we must add the ITFramework framework to our project. This framework contains the header files and compiled binary code of the classes that we will use from iTonamaton.
To add the framework, you must first navigate (in the Finder) to the "build" directory of your copy of the iTonamaton project. If this directory does not exist, make sure you have built iTonamaton already.
Next, select the "ITFramework.framework" directory that is inside the "build" directory. Drag this directory into the "Linked Frameworks" group of your project, as pictured below.
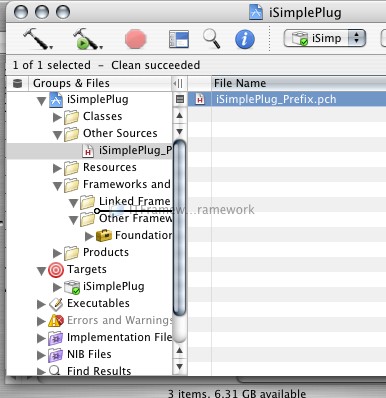
You will be presented with the following sheet:
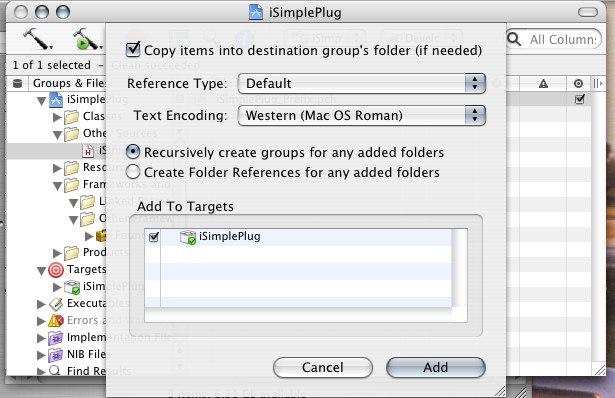
Make sure that the "Copy items into destination group's folder (if needed)" checkbox is checked. Once your sheet looks like the one in the picture, go ahead and click on the "Add" button. the framework will then be copied to the iSimplePlug directory, and added to the project.
At this point, I want to note that there is no difference, to Xcode at least, between the "Linked Frameworks" and "Other Frameworks" group. Indeed, all the groups under the "iSimplePlug" group are only there for the humans that use the program to organize their program's resources. Xcode ignores these groups, using the target checkboxes instead (like the one you set on the Foundation framework earlier). Therefore, at this time, if you would like to move the Foundation Framework to the "Other Frameworks" group, this would be appropriate. However, you are welcome to leave the framework where it is if you like.
The last step in creating this project is to create the "SimplePlug" class files. (This is the class that we designated as the Principal Class for the bundle earlier.)
Start by selecting the "New File" menu item from the "File" menu. Choose the "Objective-C class" type from the "Cocoa" group, as pictured below, and press the "Next" button.
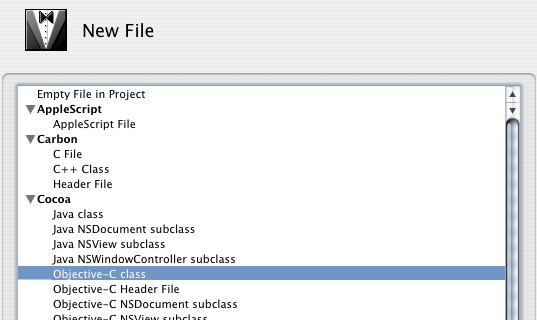
In the next window, pictured below, name the file "SimplePlug.m", and press the "Finish" button.
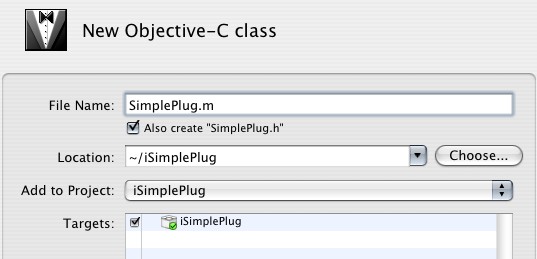
This creates the files "SimplePlug.m" and "SimplePlug.h" and adds them to the project. If you check, you will now see that in the "Groups & Files" section of the project window, these two files are listed in the "iSimplePlug" group.
It is preferrable, for our own organization, if these files are in the "Classes" group, so go ahead an drag them into that group if you so desire. Once again, Xcode doesn't care if you move them or leave them, so you may leave them if you so desire.