Chapter 8
Installation
iSimplePlug Documentation
Compiling
Compiling is very simple (if everything is properly configured), so rather than dedicating a whole chapter to it, I'm tacking it onto the beginning of the installation chapter.
To compile iSimplePlug, simply choose the "Build" menu item from the "Build" menu in Xcode. Compilation should then take place.
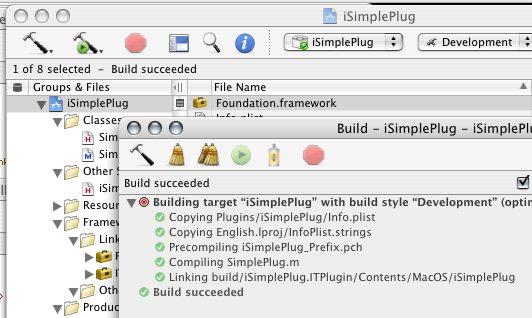
There are several different ways of customizing Xcode, and I can't remember the default one, therefore I'll mention two ways of verifying that the build was successful. The first is to look in the status line of the project window, right under the toolbar. The second is to look at the build window, which can be brought up with the "Show Detailed Build Results" menu item of the "Build" menu. The build was successful if you see the text "Build succeeded". Below is a picture illustrating what a successful build looks like on my computer:

If there were build errors, then you will need to fix them. Unfortunately, there are just far too many possible build errors, so I'll have to leave it to you to smooth them out. (It's a good learning experience anyway.) If you have put a good effort into building it, and continue to have problems getting the compile to succeed, you are more than welcome to contact me (or other iTonamaton devs for that matter) with your questions. (If you do, be sure to provide detailed information about the errors).
Once you have properly built the plugin, you can go to the Finder (or a terminal window if you prefer) and see that in the "build" directory of the project folder, there is a directory entitled "iSimplePlug.ITPlugin". This directory is the plugin, as bundles are merely directories of resources.
Installing
iTonamaton does look for plugins in the /usr/local/iTonamaton directory. However, it is preferred that they be placed in the /usr/local/iTonamaton/plugins directory. To do this, we must bring up a terminal window and do a little command line maneuvering. Open up the "Terminal" application in /Applications/Utilities.Since we are about to enter command line land, I should make some comments on notation. I am unaware of what your prompt looks like, as they are all configurable. Therefore I'll use a simple prompt (just a dollar sign) for the examples. If you are not comfortable with a shell, then you really need just remember that everything after the dollar sign is what you enter; any line of text that doesn't have a prompt before it is text that is output by the terminal.
Also, if you get an error along the way because you don't have the permissions necessary to carry out the task, you may want to prefix sudo onto the front of all your commands (i.e. sudo mkdir iTonamaton). It'll prompt for your password if you are an administrator on the machine you are using, and then execute the command with super user access. WARNING: sudo gives you the ability to erase system level files, forcing you to reinstall your operating system, so be careful!
Okay, on with the show.
First, you must create the iTonamaton directory and the plugins directory inside of it. (Note that if you are making a plugin, you mose likely have the iTonamaton config file installed already, and hence have the /usr/local/iTonamaton directory created already, as the config file resides in /usr/local/iTonamaton/.)
Execute the following commands at the prompt to create both of these directories. (Skip the mkdir iTonamaton line if you have /usr/local/iTonamaton already created.)
$ cd /usr/local/
$ mkdir iTonamaton
$ cd iTonamaton
$ mkdir plugins
The cd command changes the directory to the one specified and the mkdir command makes a new directory with the specified name.
Next, cd to the directory that contains the plugin bundle. The most simple way to do this is to type cd, then a space, at the prompt, then drag the "build" folder from the iSimplePlug project folder (from in the Finder) to the terminal window. This last step will automatically put the path to the directory on the prompt. Then press enter. Next type ls at the prompt to get a listing of all the files in the directory. You should see "iSimplePlug.ITPlugin" as one of the files listed.
For visual reference, this sequence looks as follows in the terminal. (Note that for purposes of the example, my iSimplePlug project directory is in my home directory, /Users/paploo/
$ cd /Users/paploo/iSimplePlug/build
$ ls
iSimplePlug.ITPlugin    iSimplePlug.build
Now to finish the installation, we must copy the "iSimplePlug.ITPlugin" directory to /usr/local/iTonamaton/plugins/. Assuming you haven't changed out of the build directory, this is done with the following command:
$ cp -r iSimplePlug.ITPlugin /usr/local/iTonamaton/plugins/
Be sure you have all your trailing slashes like they are shown. A miskate could cause several unexpected results, such as the overwriting of the plugins directory, or the placing of the contents of the plugin bundle in the plugins directory.
Lastely, we should verify that the plugin made it to its destination by changing into the plugins directory and listing the files in it. This is done by changing to the plugins directory, and listing the files in it:
$ cd /usr/local/iTonamaton/plugins/
$ ls
iSimplePlug.ITPlugin
If you see the iSimplePlug.ITPlugin directory listed, then you are ready to roll. Simply run iTonamaton, and assuming it was configured to run correctly in the first place, all should work.
[back]
[TOC]
[forward]
Last Modified: $Date: 2003/12/18 09:43:00 $ by $Author: paploo $